Showing posts with label #homeschoolmom. Show all posts

Wednesday, April 10, 2013

Recycled Alligator


My son had so much fun making this little guy. He loves learning about any kind of animal and especially loves painting new things so this was right up his alley. I had all the 'recycled parts' laying around so I was excited when this project came to mind. It's also a great opportunity to teach your kids the importance of recycling. My little guy got a brand new toy from practically nothing and he really enjoys making his alligator CHOMP CHOMP CHOMP!

Materials:
  • Half an Egg Carton
  • One Toilet Paper Tube (or half a paper towel tube)
  • Construction Paper  
  • Craft Glue (or hot glue gun)
  • Green Paint
  • Googlie Eyes
  Start by cutting your egg carton in half long ways to create the alligator's body. Now cut the two egg holders off of the top of the strand and keep them to use for the Alligator's eyes later.  Allow your child to paint the egg carton pieces and the toilet paper tube together.  We took a break to allow the parts to dry and ate lunch. It's hard to assemble when it's wet so I reccommend letting them dry first. You could always let your child color the 'parts' with marker if you are in a time crunch or just don't have the patience to wait :)
   When all the parts are dry, attach the eyes (the two egg holders) to the Alligator body (egg carton) by applying craft glue to the base of the eyes. Hold it in place for about 20 seconds until the glue sets.  Then attach the toilet paper tube to the eyes the same way.  Put two dots of glue on the eye egg holder and apply the googlie eyes wherever you think looks best.
   I created the alligator's legs and teeth from construction paper. Simply cut rough leg shapes out and glue to the underside of the alligator.  Cut a zig zag pattern from white construction paper and glue them to either side of the toilet paper tube, creating the teeth on the snout of the alligator. 
  Check out the alligator canvas on Etsy I made after being inspired by this project! Happy crafting!
   What are you going to do with the other half of your egg carton??? Why, make an Egg Carton Caterpillar of course!

Saturday, March 2, 2013

Shaving Cream Fish Bowl

      I did this craft with my son after we saw an aquarium at the Dr.'s office. He was fascinated by the fish, the coral, the movement. A light bulb went off over my head. What a perfect opportunity to teach him about the ocean, and give him his own little piece of it! This is a simple project with just a few steps. It is not your run of the mill paint brush to paper craft, and sometimes a change is nice.
Materials:
  • Shaving cream
  • Fish stickers (or cut outs)
  • Washasble liquid watercolors
  • White cardstock
  • Construction paper
  • Spatula
  • Cookie Sheet
  • Scotch tape
   Start by getting out all of your supplies and setting up your 'assembly' line before you bring your kids over.  First cut out a fish bowl shape from a thicker type paper (do not use construction paper for the fish bowl!)...it doesn't have to be perfect, a circle with a small lip at the top is ideal.

   Let your child spray the shaving cream on to the cookie sheet.  Then, allow him to squeeze several dots of watercolors on top of the shaving cream. Push the fish bowl down about half way into the shaving cream/food coloring mixture.
   Remove the fish bowl from the shaving cream mixture and place it onto a few paper towels. Now scrape off the shaving cream using a spatula. Get as much of the shaving cream off as possible and allow the fish bowl to dry for about 20 minutes or until it is dry to the touch.
  Now you can decorate your fishbowl with your fish stickers! I found this was the best time to talk to Eli about different types of fish, where they live and what they eat, etc. (as well as remind him that the Dr. had an awesome tank that we got to see at every check-up!) He also enjoyed counting the total number of fish in his bowl and naming their colors.  I used some cute (free) printouts to teach him the actual fish parts and their actual names. My biggest pet peeve is when parents dumb things down for their toddlers...you'd be surprised at what they can learn if you just explain things to them!
    Lastly, glue your fish bowl to some blue construction paper (or any color for that matter) and enjoy your fish tank on the fridge for several days before it gets over run by new projects :) Happy crafting, everyone! 


If you haven't heard of liquid watercolors, check them out! 


Tuesday, February 26, 2013

Coffee Filter Butterflies


My little man lovvvved this project. It was pretty simple and doesn't make too big of a mess. I like multi-step projects like this every once in a while because it really teaches Eli to work on his patience while exploring an new medium.  These coffee filter butterflies can be made with things you have on hand and are really cute hanging on the fridge!
  
Materials:
  • Coffee filters
  • Washable watercolors 
  • Pipe cleaners
  • Glue gun
  • Magnet sticker strips
  • Old plate/tupperware
  • Paintbrush 
  • Paper bag 
  • Tongue depressors 


   I always loved a technique similar to this when I worked as a preschool assistant so I just tweeked it a little bit so we could do it at home.  Start by finding an old plate or tupperware container you don't mind getting paint on...it will wash off in the end so I just used a normal plate we had in the cabinet.  Grab the coffee filters, too. You need 1-2 filters for each butterfly so grab accordingly.  Flatten the coffee filter onto the plate and have your watercolors ready.
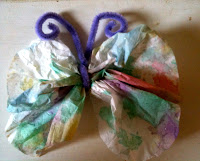
  Let your child paint the coffee filter with the watercolors. The filter will get soaked in paint and at some point you have to stop your child and give them a new filter.  Put the wet coffee filters on a paper bag to dry, I find the paper bag soaks up the excess water the best and doesn't stick to the wet filter...you could also use paper towels.
  If you want to make a butterfly without magnets, fold a pipe cleaner in half, gather the filter in the middle, and wrap the pipe cleaner around the middle. This is the butterfly's antenna.
  If you want to make a butterfly that will go on the fridge, gather two filters and hot glue the centers to a tongue depressor.  These are the butterfly's wings, put them close together or far apart...where ever you child thinks looks best :) We did a few of both.
  Now bend a pipe cleaner in half leaving a small loop at the bottom to attach to the tongue depressor. This is the antenna. Attach the antenna to the topside of the tongue depressor with your hot glue gun, on the same side you previously glued on.
   Once the glue on the wings and antenna is dry, cut two, one inch strips from a magnet sticker strip. Peel the backing off of the magnets and apply glue to the areas on top of both wings. (see pictures.) Place the magnet pieces on top of glue and allow it to completely dry.
   All you have to do now is stick them to the fridge, or make more! We made extras while we had all of the supplies out because I plan on using them as gift toppers! Cute, right?!
   If you really want to get into it, check out my egg carton caterpillar to explain to your kids how a butterfly is born! Or, make a packing peanut painting of a caterpillar!


Monday, February 25, 2013

Packing Peanut Paintings

Sometimes painting on a flat piece of paper gets old.  Try this smart trick to give your kids a new sensory experience. Packing peanuts are good for so many crafts and people are so quick to throw them away! So save those peanuts!  One day your kids will get stir crazy and you will need a new project for them to pour themselves into.

Materials:

  • Packing peanuts (hopefully left-overs from a package but if not you can buy them cheap.)
  • Thick paper (I used dry-cleaner shirt boards.)
  • Kid's glue
  • Any size paintbrush
  • Washable paint
  • Sharpie

   Start by choosing the paper you are going to use.  We save the cardboard pieces the dry-cleaner uses when they wrap up your shirts, they are great for so many craft projects.  As a matter of fact, you should start a 'craft scrap' bin in your house somewhere.  We save all of our scraps and store them in a big basket that we call our 'supply box'. Eli loves sorting through it and it's fun to figure out what to make out of your 'left-overs'.
   Now grab your packing peanuts. Glue them to the board in any shape you want.  We did a snake and a rainbow. They were the first things that came to my mind, but you could do any animal outline or shape. This is a great holiday craft, too...snowmen for Christmas, shamrocks for St. Patrick's Day, flower's for Mother's Day, there are so many options!

   Let your packing peanuts dry for a few hours and come back to the project ready to paint.  Use any size paintbrush and let your kids paint the packing peanuts and the surrounding paper/board.  This is a cool new thing for them to paint and it will be exciting for them to experience a new technique. Explain to them the difference in texture, the sounds it makes when they paint over it, etc.  Texture is a difficult thing for kids to understand so this is a great opportunity for them to learn something new!
   Once the paint is dry, use your sharpie to label what they drew.  When you label it, spell it out-loud and your kids to spell it back to you.  Having the name of their drawing right next to it will be effective recognition and it will help them when they learn to read.
  Enjoy your kids and help expand their imagination! They are never to young to craft!


Sunday, February 24, 2013

Recycled Race Car

   This recycled race car will give you hours of enjoyment and will double as a toy box when your kids are done with it!  It was another rainy day when thought of  this old favorite.  Like any boy, my little guy LOVES to 'play cars'.  It doesn't matter how old, beat up or how many missing wheels there are-a car is a car to a two year old.

Materials:

  • One cardboard box (usually the grocery or liquor store will give you one, or several, if you just ask!)
  • Spray Paint (you only need one color, and any you have on hand is fine.)
  •  Two paper plates (Styrofoam works, too.)
  • Black sharpie
  • Washable markers
  • Crayons
  • Stickers (we used 'transportation' themed stickers but any kind will do.)
  • 4 Brads (if you don't have these, and don't want to make a special trip for them, you can use glue instead.) 
  • One excited kid!

Who doesn't love sidewalk chalk?!


    I don't care how old you are. Can anyone seriously hold a piece of sidewalk chalk in their hand and not smile? This is one of my favorite past times and I am sooooo lucky my son loves it, too. We could sit out there for hours drawing until we run out of space and have to venture into the cul-de sac...that has actually happened.
   I think it is so important for a child to learn while playing. I always try to think of fun ways to teach my little guy things without him knowing it. He is only two, so our 'learning' mainly consists of letters, colors, shapes, etc, but there is so much more you can teach a child with chalk. Math is a big one.  I remember doing my times tables on the driveway as a kid. And hop-scotch! That's a simple counting game and kids have loved it for centuries.
    One thing that bothers me, though, is how un-inventive adults have become when it comes to their 'chalking.' Come on. We can only draw a rainbow, or a smiley face so many times.  I am always amazed, and a little jealous, of a kid's imagination. I mean, who would think to draw a purple cupcake castle with icing slides and sprinkle trees? Not me!
   Think out of the box. Who cares if you mess up, it's going to wash away in the next few days! Think about drawing scenes, or repetitive patterns. If you have any kid of brick near your home you've hit the jackpot. Color each brick one color. Then another on top of that, then another, and another until you have a beautiful rainbow of colors that is so much fun to look at! (And much more interesting than those basic rainbows you learned to draw in first grade.) You can turn it into a game by asking each child to hop onto a certain color, or count the number of 'blue' bricks.

Saturday, February 23, 2013

Silly Monster Party Favor!

   
    I recently started planning kids parties and I must say it is soooo much fun. I loved being able to use my talents to really go all out on a themed party. I was able to create fun activities,  invitations,  party accessories, thank you notes and a birthday banner! This was a party for my good friend's little guy, Graham, who was turning one. She kept telling me not to out-do myself but it is so hard when all these ideas are running through my brain! Check out my Etsy shop for printables  and decor to instantly customize your kid's next party!

Materials:

  • Chinese-take out container
  • Pipe cleaners (any color.)
  • Foam paper (any color.) 
  • Sharpie
  • Googlie eyes
  • Hot glue gun (or Elmer's)
  • Easter grass (any color.)
   One of the first things I thought about was the party favors. That was always my favorite part a birthday party growing up, so I knew I wanted to do something awesome for the kids that would also coordinate with the theme.  So this little monster was born :) I used them as party favors but you can just as easily make a few for your kids to play with at home. We still have ours that my son uses to tote things around in. He loves it.
   I found these great little chinese take-out containers at the dollar store in a 4-pack....Yes, 4 for a $1! How can you beat that?! They even came with the handle attached-score!
   I started by filling them up with candy, stickers, erasers, the typical party favor loot. After they were all filled I added the googlie eyes with my hot glue gun. You can glue them on with Elmer's but I didn't have the patience to wait for them to dry- I was making a bunch so it was easier to use the faster drying glue on my assembly line.  Make sure you add extra eyes on some and give some a single, centered eye. These are monsters so they shouldn't all look the same :)
   Once all the eyes were in place I used a sharpie to draw on the faces. If you don't feel so confident in your monster-face making abilities, Google it to get some ideas.  Now you are ready for the feet.

   Use any type of foam paper to cut out the monster feet. Any shape will do and there is no need to trace a shape before you cut it out, monster feet are supposed to lop sided. I used a shape that looked like a heart with an extra bump in the middle, pretty simple to cut in mass quantities. You can place a few sheets on top of eachother to cut more than one out at a time; this is convenient if you are using them as favors.  Then, add toenails with a contrasting sharpie color. Attach the feet with hot glue (or Elmer's, it will need to sit to dry) and stick them to the underside of the take out container.
  Now it's time for the antennas. Cut a full size pipe-cleaner in half and wrap the end 2-3 inches around a pencil to give it a little swirl.  Slide the pipe-cleaner off the end of the pencil and attach it to the side of the container by using hot glue. I glued my antennas in between the two flaps on top so you wouldn't see the glue.

  The last step is what really gives these monster's their character.  Add their wild hair by placing a large area of glue on the top of the closed container.  Wod up a tennis ball size of easter grass and push it into the center of the glue. Hold for a second, and re-arrange the hair so most of it is sticking to the glue. Easter grass is so long that you don't have to worry about every inch of the grass sticking. You may have a few stragglers that didn't quite stick, just blow on the monster once the glue is dry and the excess hair will fall off. That's all, folks!
   Now you have a silly monster tote! Let your kids make multiple monsters for even more fun or check out the other projects I did for this party HERE! 


Here are some more monster party decor ideas!


Pipe Cleaner Accessories!

   This is a great project for developing hand eye coordination.  It will also help to avoid alot of frustration for the little one's who can't quite string beads onto a wobbly strand yet. We happened to inherit a TON of beads from my mom, Gigi, so we decided to take full advantage of our surplus :)
    
Materials:

  • Pipe cleaners
  • Beads (use beads with larger holes for the little ones who can't string them yet.)
  • A happy kid!
  • Buttons (these are a new, fun type of 'bead' to string.)
   This project is pretty self-explainatory.  Simply show your child how to string the beads and buttons onto the pipe cleaner and encourage them to be patient as they fill it.  Leave about an inch bare on either side so you can create the bracelet enclosure.
   Once they are happy with the amount of beads on their pipe cleaner, they can decide whether they are making a bracelet or a pair of silly glasses...or both!
    *To make a bracelet, once you are through stringing beads, shape one end of the pipe cleaner into a circle and use the other side to fasten it by wrapping it around the end of the circle.  

    *To make a pair of silly glasses, make a bracelet but don't create the enclosure at the ends.  Instead, wrap the ends around each other to avoid the sharp ends of the pipe cleaner sticking out.  Now make another circle but attach it to the other circle the same way you closed the first one. Use two additional pipe cleaners without beads to create the rest of the glasses. 
 

Egg Carton Caterpillar


   This is such a cute and easy project. My two year old is really into animals lately and loves learning about new creatures! Projects like this really give your child a chance to learn more about his/her surroundings. After we made this little fella' we went outside to look for some...after he learned about where caterpillars live he was fascinated with finding one! We did end up finding a worm, which he quickly pointed out was not a caterpillar due to it's lack of legs :) We will find one in the backyard eventually....

   Materials:

  • one old egg carton
  • stickers
  • crayons (don't use markers for this one, they don't stay on the carton and rub off EASILY onto your child's hands.)
  • piece of scrap paper
  • black sharpie (for parent's use only.)
  • scissors (for parent's use only.)

   First, completely cut off the top flap of the egg carton leaving the bottom detached. Once you have the bottom portion of the carton all by itself, you are ready to make TWO caterpillars! Yay! Now, cut down the middle of the carton, long ways, splitting the 'egg holders' in half.

Friday, February 22, 2013

Recycled Paper Bag Canvas!

   This isn't really a project, but more of an idea. Being a stay at home mom/business owner, I have learned to think quick when it comes to entertaining my little man. But, sometimes he is just not into sitting down and listening to me explain a longer project-"mommmmmm!"
  So this idea came to me on a rainy day that also happened to be a busy order-filling day for me. I needed something that was going to entertain him for a while that didn't include plopping him in front of the tube for an hour. This did the trick!
  
Materials:


  • paper grocery bag
  • scissors
  • markers/crayons
  • stamps/stickers
  • paint (you don't HAVE to use paint, but it always makes it more fun.)
  • one bored, cabin fever-ridden child.

   All you need to do is...drumroll, please... cut the bottom out of your paper grocery bag then cut one more time anywhere along the side! Now you have a HUGE surface for your kid to go crazy on. They can paint it, color it, stamp and sticker it. Anything that you have in your bag of crafty goodies will do. 
I even turned it over onto the other side and added paint to the mix. The rain stopped enough for us to slap it onto an easel and continue outside! Eli really liked this because I don't normally lug his easel outside, but it was that kind of day.

Duct Tape Painting

   
   This is one of my favorite projects, even my husband said it turned out pretty cool! It's especially great for the little one's.  My little guy, Eli, just loves painting, so when I decided to do this project I knew he would be thrilled.

Materials:

  • 4 canvases of equal size
  • any kind of paint ( for kids I always suggest any WASHABLE paint.)
  • duct tape (or painter's tape if you'd rather)
  • a paintbrush
   Start by grabbing your canvases. Put them side by side on a flat surface so you can begin the taping process. You can cut the tape to make the wording bubblier, or you can do what I did and just use the block lettering look.
    Decide on what word you want to use. I used the word 'LOVE'.  It's pretty universal and great as a gift later on. Ok, now grab your duct tape....Yea, duct tape! I find it's just as good as painter's tape if you aren't looking for perfect lines.  If you have painter's tape and want straighter lines, stick to that.  Which ever one you use, just make sure to really stick it down onto the canvas-give it a few good pats to make sure it's not going anywhere.   
   Go ahead and put the tape where you don't want paint to go. It's simple,  just use the tape to make that letter. You can paint them all at once or one at a time, makes no difference in the end. I put them on a low coffee table I keep in the garage just for painting and crafting on so I didn't use a drop cloth, but you might want to.
  Now let your little one go wild. Don't worry about the paint glooping or sticking to the tape, it will dry eventually.


Hey guys!

Ok, so I am new to this whole blogging thing, so bear with me for a bit. My name is Jessica, I am the owner/artist at Blossoming Buttons. We do all kinds of stuff here. While I started the business with custom stationery, it continues to grow every day! We are even doing custom birthday parties now-it's so fun!
   I wanted to use this first post as an introduction to me!  So here goes nothing....I love anything DIY and anything art-related. At a very young age my parents noticed that I could draw...pretty well if I do say so myself :)  From that point on I was getting my hands into every medium I could.  I love oil on canvas, pen and ink and most of all just plain old pencil on paper. That is how my stationery business started-just doodling.
   It began with custom orders for friends and family and slowly grew into something bigger. Now I have a website, a  twitter account, an Etsy site even a Blossoming Buttons facebook page! Amazing, huh? I spend my days crafting and filling orders, I pinch myself daily because I can truly say I am doing what I love. 
   By creating this blog I'm hoping to inspire other fellow crafters to get out there and get artsy. It drives me crazy when people look at art and think "how did they do that?' YOU CAN DO IT! Whether it be a project I've done with my toddler, or a DIY project for around the house I will find that spark and run with it.  I will drag out that DIY person hiding deep down inside of you kicking and screaming  if I have to! I love feedback, and to chat, so feel free to bounce your ideas, projects and questions off of me! 


#DIY #Homeschoolmom #DIYproject #havefun #youcandoit