Showing posts with label #rainyday. Show all posts

Wednesday, April 10, 2013

Recycled Alligator


My son had so much fun making this little guy. He loves learning about any kind of animal and especially loves painting new things so this was right up his alley. I had all the 'recycled parts' laying around so I was excited when this project came to mind. It's also a great opportunity to teach your kids the importance of recycling. My little guy got a brand new toy from practically nothing and he really enjoys making his alligator CHOMP CHOMP CHOMP!

Materials:
  • Half an Egg Carton
  • One Toilet Paper Tube (or half a paper towel tube)
  • Construction Paper  
  • Craft Glue (or hot glue gun)
  • Green Paint
  • Googlie Eyes
  Start by cutting your egg carton in half long ways to create the alligator's body. Now cut the two egg holders off of the top of the strand and keep them to use for the Alligator's eyes later.  Allow your child to paint the egg carton pieces and the toilet paper tube together.  We took a break to allow the parts to dry and ate lunch. It's hard to assemble when it's wet so I reccommend letting them dry first. You could always let your child color the 'parts' with marker if you are in a time crunch or just don't have the patience to wait :)
   When all the parts are dry, attach the eyes (the two egg holders) to the Alligator body (egg carton) by applying craft glue to the base of the eyes. Hold it in place for about 20 seconds until the glue sets.  Then attach the toilet paper tube to the eyes the same way.  Put two dots of glue on the eye egg holder and apply the googlie eyes wherever you think looks best.
   I created the alligator's legs and teeth from construction paper. Simply cut rough leg shapes out and glue to the underside of the alligator.  Cut a zig zag pattern from white construction paper and glue them to either side of the toilet paper tube, creating the teeth on the snout of the alligator. 
  Check out the alligator canvas on Etsy I made after being inspired by this project! Happy crafting!
   What are you going to do with the other half of your egg carton??? Why, make an Egg Carton Caterpillar of course!

Saturday, March 16, 2013

Custom Coloring sheet!

Because I love all of you so much, I have decided to offer an (almost) FREE coloring sheet! Use this sheet to customize your child's next birthday party or just at home on those rainy days! Set up a coloring station at the party where you provide everything they need to 'customize their ride.'  Set out crayons, glue sticks, stickers, pom poms, glitter, anything to help them create a custom truck.  Use the coloring sheet in an activity station or roll it up and tie it with a ribbon to stick in the party favor bags :)


Click Here to purchase this custom coloring sheet in my Etsy shop.


Are you having a truck themed party? Well check out my adorable Truck Invitations and printable party accessories! Click the links below to find more Truck themed Stationery!

***
Truck Birthday Invitations and Envelopes.


***
Printable Truck Birthday Invitations.


***
Printable Truck Party Set.


Wednesday, March 13, 2013

Scrap Paper Project!

Scrap paper. Should I save it? Toss it? No! Don't throw it away, save it for goodness sake! If you are into crafts with your kid at all, you know what I am talking about. Those little pieces of construction paper left over after you practice cutting, gluing, etc. that really start to get on your nerves. I started doing this little project with my son to utilize all those extra scraps. Just save all your left-overs in a ziploc bag and use then when you have enough for this fun art project. When they are gone...start saving again!
Materials:
  • Scrap paper (any old kind will do!)
  •  Glue Stick
  • Washable Markers
   Start by drawing a shape of an animal, letter, number, anything you can think of! I used an octopus because this is what my son requested. We did a car after that.  
   Tare up all your scraps that you have saved in your little ziploc baggie.  Make the pieces small enough so little hands can grab them and glue them on, you also want them to fit throughout the entire shape. You could even tare up longer pieces for legs, arms, etc.  Now let your child glue the little pieces of scrap onto their 'octopus.'  This project is great for hand eye coordination and can really help them with patience.
   Try to encourage them to glue 'inside the lines' and talk to them about why they are putting the pieces where they are. "Are you gluing the eyes? Good Job! Where is that green piece going? Oh cool...the tentacles!" Kids are more likely to get into something if they see that you are enjoying it, too. Enjoy this time when they will sit down and communicate with you because I am told that will not last long :)

  Do they want more?!?! Give it to them! Use your scraps from this project to add buttons to your Recycled Race Car, or add little feet to your Egg Carton Caterpillar! These are just a few of many ideas! Happy crafting, everyone! :)

Tuesday, February 26, 2013

Coffee Filter Butterflies


My little man lovvvved this project. It was pretty simple and doesn't make too big of a mess. I like multi-step projects like this every once in a while because it really teaches Eli to work on his patience while exploring an new medium.  These coffee filter butterflies can be made with things you have on hand and are really cute hanging on the fridge!
  
Materials:
  • Coffee filters
  • Washable watercolors 
  • Pipe cleaners
  • Glue gun
  • Magnet sticker strips
  • Old plate/tupperware
  • Paintbrush 
  • Paper bag 
  • Tongue depressors 


   I always loved a technique similar to this when I worked as a preschool assistant so I just tweeked it a little bit so we could do it at home.  Start by finding an old plate or tupperware container you don't mind getting paint on...it will wash off in the end so I just used a normal plate we had in the cabinet.  Grab the coffee filters, too. You need 1-2 filters for each butterfly so grab accordingly.  Flatten the coffee filter onto the plate and have your watercolors ready.
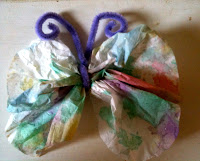
  Let your child paint the coffee filter with the watercolors. The filter will get soaked in paint and at some point you have to stop your child and give them a new filter.  Put the wet coffee filters on a paper bag to dry, I find the paper bag soaks up the excess water the best and doesn't stick to the wet filter...you could also use paper towels.
  If you want to make a butterfly without magnets, fold a pipe cleaner in half, gather the filter in the middle, and wrap the pipe cleaner around the middle. This is the butterfly's antenna.
  If you want to make a butterfly that will go on the fridge, gather two filters and hot glue the centers to a tongue depressor.  These are the butterfly's wings, put them close together or far apart...where ever you child thinks looks best :) We did a few of both.
  Now bend a pipe cleaner in half leaving a small loop at the bottom to attach to the tongue depressor. This is the antenna. Attach the antenna to the topside of the tongue depressor with your hot glue gun, on the same side you previously glued on.
   Once the glue on the wings and antenna is dry, cut two, one inch strips from a magnet sticker strip. Peel the backing off of the magnets and apply glue to the areas on top of both wings. (see pictures.) Place the magnet pieces on top of glue and allow it to completely dry.
   All you have to do now is stick them to the fridge, or make more! We made extras while we had all of the supplies out because I plan on using them as gift toppers! Cute, right?!
   If you really want to get into it, check out my egg carton caterpillar to explain to your kids how a butterfly is born! Or, make a packing peanut painting of a caterpillar!


Saturday, February 23, 2013

Pipe Cleaner Accessories!

   This is a great project for developing hand eye coordination.  It will also help to avoid alot of frustration for the little one's who can't quite string beads onto a wobbly strand yet. We happened to inherit a TON of beads from my mom, Gigi, so we decided to take full advantage of our surplus :)
    
Materials:

  • Pipe cleaners
  • Beads (use beads with larger holes for the little ones who can't string them yet.)
  • A happy kid!
  • Buttons (these are a new, fun type of 'bead' to string.)
   This project is pretty self-explainatory.  Simply show your child how to string the beads and buttons onto the pipe cleaner and encourage them to be patient as they fill it.  Leave about an inch bare on either side so you can create the bracelet enclosure.
   Once they are happy with the amount of beads on their pipe cleaner, they can decide whether they are making a bracelet or a pair of silly glasses...or both!
    *To make a bracelet, once you are through stringing beads, shape one end of the pipe cleaner into a circle and use the other side to fasten it by wrapping it around the end of the circle.  

    *To make a pair of silly glasses, make a bracelet but don't create the enclosure at the ends.  Instead, wrap the ends around each other to avoid the sharp ends of the pipe cleaner sticking out.  Now make another circle but attach it to the other circle the same way you closed the first one. Use two additional pipe cleaners without beads to create the rest of the glasses.