Showing posts with label #diy. Show all posts

Friday, November 22, 2013

Turkey Crafts!

  Thanksgiving is so close and most work places (and schools and day-cares) are closed for at least part of the week. If you are looking for some fun projects to do with the kiddos when they are home look no further! 
   We had so much fun at school this week with the 'turkey' theme. If you want more detailed instructions for any of these crafts, click on over to my facebook page!

Coffee Filter/Toilet Paper Roll Turkey


Handprint Turkey


 Paper Bag Turkey


Turkey Cupcakes


Paper Plate Turkey


Sunday, November 10, 2013

Astronaut Helmets!

  This is such a great art project if you are having a Space theme or talking about astronauts with your class. My kids loved experimenting with tin foil and we had a center that day that allowed them to manipulate it and discover the shapes they could make out of it. Overall, it is a simple project but it lends itself great to imaginative play. Enjoy, my fellow moon-goers!


Materials:
  • Paper Plates
  • Aluminus foil
  • Elmer's Glue
  • Black Construction Paper
  • USA Stickers (optional)
  • Pipe Cleaners
  • Hole Puncher
  • Scissors
Start by cutting the helmet's visor out with a pair of scissors.  Then allow each child to tear up pieces of tin foil and glue them to the plate itself. Once they are satisfied with the amount of coverage, glue on the USA sticker and the two circle shaped ear pieces to either side.

   Let the helmet dry for at least 45 minutes before using a hole punch to make two holes on either side of the helmet.  String a pipe cleaner through each hole and twist them so they are secure.


  Attach the helmet to the child's head by twisting the two pipe cleaners around eachother so the helmet is snug. Now let the imaginative play begin! You can go to the moon or service your spaceship, the opportunities are endless!

Enjoy!


Sunday, September 15, 2013

Bubble Wrap Turtles

   My kiddos loved making these bubble wrap turtles to go along with our swamp unit. They require a bit of up front cutting, but the kids love assembling the parts and the bubble wrap technique is pretty cool.

Materials:
  • White, green, blue and yellow construction paper 
  •  Googlie Eyes (two per turtle)
  • Glue
  • Bubble wrap
  • Green paint
  • Paintbrush

  Cut the white construction paper into a shell shape, the green construction paper into four legs and one tail and the yellow paper into a the shape of a head.
   Use about a 10"x6" piece of bubble wrap, bubble side up, and let your child paint the bubbles 'turtle' green with a paintbrush. Then, push the white turtle shell into the bubbles and peel it away, leaving it looking like a turtle shell!
   Now, glue the shell to a blue piece of construction paper, as well as the other turtle 'parts.' Finally, let them glue on their goolie eyes. Voila! You have a turtle! I used this as part of the Swap unit in my 3-year old class. My kids really enjoyed learning about turtles so I decided to add this project :)
   I always like to watch several kids do the same project, it's always interesting how different they turn out even when they have the same supplies.  Art is so great for kids and they really enjoy it! Happy Turtle Shell making, everyone!!! :)


DIY Thomas the Train Brick Tunnel


  My son LOVES Thomas the Train right now and any other mom experiencing this stage of childhood is also experiencing the cost. Thomas is adorable.  I have to admit they are pretty durable but they are pricey! We have found several pieces at the thrift store that I was able to clean but whenever we splurge and buy any new piece my stomach turns a little bit. However, we can create many awesome Thomas accessories at home! Check it out!

 Materials:
  • Shoebox
  • Paint (red, brown and green)
  • Large, flat tipped paintbrush
  • Trains (of any sort)
  • Scissors
   First, I cut the two 'tunnel' holes into either side of the upside down shoe box. You can cut them into any shape, but I made ours rounded becuase it was easier not to have to make a sharp corner turn with the scissors. 
   Now, paint your tunnel however you want to. You could just let your child paint all over with no pattern, or if they're old enough (my almost 3 year old did this) you can show them a new kind of painting technique. We used modified stippling technique. To achieve this, dab the end of a flat paintbrush against the outside of the shoebox over and over.  I showed my little guy that if you dipped the brush in brown then red that it would give it a shadow effect. He got it and our bricks turned out really great!
  Then, he decided we needed trees on the outside of the tunnel. Easy Peasy.  Just use the same stippling technique as you did with the bricks, but with green paint.
  After the tunnel has dried you are ready to play! Just set the tunnel over your Thomas tracks (or any train or truck or car for that matter) and enjoy the hours of entertainment! We have already made an egg carton tunnel and a paper towel roll castle (posts coming soon) all using recycled materials!
                                                              Happy Tunnel Making!!!


Saturday, June 8, 2013

DIY Shoots and Tunnels Car Garage

This project really became a favorite in my household.   Not only was this 'shoots and tunnels car garage' (as we call it) fun to make but it has also logged many hours in our household as favorite toy.  It is super easy to make,  completely made of recycled materials, and is a really sturdy toy that has really proven its durability.  Eli, my two year old, is so into cars right now. Really, anything with wheels that moves.  He has had more fun with this homemade contraption than with any other new toy he has acquired.  I feel good knowing that he can still appreciate the simple (and cheap) things in life. :)

Materials:
  • Soda 24 pack cardboard box
  • 3-5 paper towel/toilet paper rolls
  • scotch tape
  • scissors
  • paint
  • Hot glue gun (optional)
  • Stickers (optional)
   Start by deciding where you want your 'shoots and tunnels' to end up. Arrange them so the cars will end up in different places once out of the tunnels.  Think outside (or inside) of the box :) I cut two holes in our soda box so one tunnel could go through the box... I really scored some mommy points for this idea.
  Tape or hot glue the shoots and tunnels into place. I put tape around the outside of some of the rolls and some on each opening.

   Once you have all the shoots and tunnels you want, paint the entire thing with any color paint. We just used one color but you could also paint a scene, highway, etc. all over it if you child is a bit older and able to paint 'things.'

   We painted before nap time so it could dry for a few hours, then we added foam transportation themed stickers all over it....done! Our 'shoots and tunnels car garage' as Eli promptly called it was ready for action! 

   Eli still plays with this daily and we made it over a two weeks ago...it has also held up and so far (knock on wood) and I have not had to patch it up anywhere!

  Enjoy this fun, simple project and take the time to explain to your kids the importance of recycling and using our imagination! 


Tuesday, May 28, 2013

Super Fab Art Display Clips


   These super sparkly and fabulous clips are the perfect way to display your kid's artwork! You may get sick of seeing those ugly vacation magnets or just feel like their artwork deserves more attention...I did! 
   As soon as I started using these clips for Eli's art I could tell that he felt special.  He loved that I was using the 'special clips' to display his art. A little bit of recognition can go a long way in proving to them that they are amazing...because they are!

Materials:
  • Clothespins
  • Two part Epoxy Glue
  • Spray Paint
  •  Glitter!
   Begin by spray painting your clothespins with a thin layer so they have a some color underneath the glitter. Allow the paint to dry a few minutes before you add one last coat. If you are going for the ombre look, just swipe another lighter shade spray paint on the upper half of the clothespin.  Move the can over the clips quickly to get more of a faded look.
   Once the paint has completely dried you can glue the magnet onto the back of the clothespin. I used a two part epoxy to make sure the magnet didn't come loose after a few uses.
   Now add the glitter :) I used Elmer's Glue for the glitter becuase it isn't really holding alot of weight. Add glue to all or part of the front of the clothespin and sprinkle on the glitter.
   Voila! You have a fabulous new way to display your kids awesome art! You could also attach art to a 'clothesline' display using these sparkly clothespins! Now go let them make some new art that you can hang!


Friday, April 19, 2013

Thrfit to FAB! Chevron Frames

   I was looking to fill some wall space in my son's room so I immediately took a trip to the thrift store (Goodwill in this case) to score a new treasure. I got soooo lucky this time. I found eight identical metal frames in awesome condition.  I knew I wanted to display photos of my little guy but I didn't want to use a typical large frame with multiple pictures inside a boring matte, I wanted it to look unique. I think I accomplished the look I was going for in the end...classic yet fun enough for a child's room.

Materials:
  • Thrift store frames in good condition
  • Spray paint (I used Krylon metal spray paint)
  • Acrylic paint
  • Thick Paper ( I used dry cleaner cardboard inserts)
  • Photos
  • Scotch Tape
  • Painter's Tape
  Start by taking apart your frames. If you are using a grouping with several different size frames, make sure you keep the 'parts' of each frame together so it is easier to assemble them at the end.  Separate the actual frame from the backing and glass and clean it with a damp paper towel to remove any dirt.  Spray paint the frames any color. I suggest doing at least two coats, depending on what shade you are trying to paint them they may need additional coats for 100% coverage. Wait at least 15 minutes in between coats and apply a light dusting rather than a soaking. If you apply too much spray paint at once it will drip and not look very cute :)
  For the background of the frame, use painter's tape to create a striped pattern. I chose a chevron pattern so I taped my paper off in a diagonal direction, you could also do vertical or horizontal stripes just as easily.        Smooth the painter's tape so there are no leaks and paint over it using acrylic paint. I just used one thick coat of acrylic  for this step becuase I was looking for a 'worn out' look. If you want the stripes to be solid, paint two coats of acrylic and wait at least 30 minutes in between coats.
  Slowly peel the tape away from the paper once the paint has completely dried. If you try to rip the paint off too quickly you may pull chunks of paint off.
   Now choose the pictures you want to display and secure them to the center of your patterned paper using scotch tape. Re-assemble your frames and oogle at your accomplishments! 
   My grouping of eight (8.5"x11") custom frames only cost me about $8 :) How can you not be happy about that?!?!?!

 Don't want to take the extra step of creating your own background? Check out my Repurposed frames  post and discover how easy (and cheap!) it is to create a beautiful photo grouping!


Sunday, March 3, 2013

Glass Container Party Decor

   Just a few minutes of assembly and you have these cute, coordinating table centerpieces!  They are so easy to make and you probably have most of what you need on hand.  Choose any little toy or trinket that goes along with your theme to pull the party together. When my son turned two, I had several of these on the tables with balloons anchored inside of them. They turned out so cute that I had to share this little gem!
Materials:
  • Glass Container (any shape will do!)
  • Birthday Candle
  • Plastic Toy/Trinket
  • Glass Beads  

   There is really only one trick to this simple project...holding the plastic toy, in this case a truck, in place when you pour in the glass beads. Fill up the bottom of the container with a few bead then place the truck against the front of the glass and begin to fill in beads behind it. After a few more beads, add the number birthday candle above the truck. If the jar opening is not big enough for your hand to fit while you fill, slightly tip the container forward so the truck stays in place and pour the beads in slowly. It may take some finageling with after the entire container is filled with beads, but as long as you can see most of the toy the overall effect is achieved.   
   I love this project because it is cheap and easy but it looks great.  You can use any number of things instead of the truck like I chose. Use plastic Dora figurines for a Dora themed party, Dinosaurs for a Dino Party, etc.  I bought my glass containers at Goodwill for about $.75 a piece and bought all the beads for 6 centerpieces for $8 at the dollar store! Happy party-planning, everyone!


Thursday, February 28, 2013

Magnetic Cookie Sheet

   Any parent can benefit from this trick! Have you ever found yourself gripping the stearing wheel just a little too tight when your kids ask 'are we there yet' for the fiftieth time? I'm guilty of it on several occassions, but really, can we blame them? I get bored, too! This  project will give them a new, exciting activity to play with in the car. And who knows...maybe it will buy you 30 more minutes of silent riding :)

Materials: 
  • Old cookie sheet
  • Several matchbox cars (If you have them, use the rejects that are missing wheels. )
  • Magnetic strips
  • Hot glue gun (and glue sticks.)
  • One car-crazy child
   As I have said before, my son LOVES car.  Any project I can think of that will include his obsession is fine with him. This activity not only provides entertainment in the car but it also helps to improve his hand eye coordination.  
   First cut the magnetic strip into 1/2" sections and reserve two for each car. Peel the sticky backing off of the magnet strip and squirt a pea size amount of hot glue onto the sticky part of the magnet. 
   Attach the magnet pieces of magnet onto the flattest part of the underside of the car. In my case, it was most flat in between both sets of wheels. If it works better on a particular car to use a bigger strip in the middle, do so. Let your magnetized cars dry for at least 15 minutes to ensure the magnet won't come off...Be careful if you are using this activity for small kids who are still interested in 'eating' toys.
   Now you are ready to attach the cars to the cookie sheet! Your kids will love to play with their new toy...even with all the new colorful plastic toys out there, my son still prefers a good home-made invention any day :) I knew he was mine!
   You could also use your coffee filter butterflies on the cookie sheet as well! Think outside the box to come up with new 'magnet' ideas....glue magnet strips to pipe cleaners to create 'roads,' or use shells you found at the beach as a different shape for them to explore! The options are endless! Go try out your new invention with a nice, long car ride!

 *To make things even easier, check out this magnetic tape! (I still suggest using hot glue to adhere to toys.)


Wednesday, February 27, 2013

Tin Foil Paint Tray Clean-up

   
Sometimes just thinking about doing a painting project can make you tired, especially when you have a toddler to look after while cleaning up. This idea really came out of necessity.  I needed something that was going to help me clean up his easel after we used it. 

Materials:
  • Aluminun foil
  • Paint
  • Paint brush
  • Messy child
   Although it isn't necessary for me to get the easel completely clean after each use, the big blobs that would stick to the easel paint cups after only 10 minutes really bothered me.  I needed something that was going to buy me some time so I could get my little man cleaned up before I had fingerprints all over my walls and before the paint would stick to the easel...what.a.pain.  Then it came to me----Tin foil!!!!  Why hadn't I thought of this before? I use tin foil when I am painting (it is easier to mix colors on, more so than plastic) so I felt really dumb when I finally started using this technique with Eli.
  All you do is line the easel paint cups with tin foil! Shape the tin foil the best you can to fit inside whatever you will put the paint in then when you are done you just ball it up and throw it away! Genius if I do say so myself.  Especially when I am busy with +Blossoming Buttons Custom Stationery and Art!
   Most parents who avoid painting projects are mostly worried about the mess and the clean up. You can't control the mess, you have a kid, but you can make the clean-up a little bit easier! Got any other tips I haven't thought of yet? Please comment and share them! Use this technique for any other painting project, see us use it in the packing peanut project! Happy painting, everyone :)


Tuesday, February 26, 2013

Coffee Filter Butterflies


My little man lovvvved this project. It was pretty simple and doesn't make too big of a mess. I like multi-step projects like this every once in a while because it really teaches Eli to work on his patience while exploring an new medium.  These coffee filter butterflies can be made with things you have on hand and are really cute hanging on the fridge!
  
Materials:
  • Coffee filters
  • Washable watercolors 
  • Pipe cleaners
  • Glue gun
  • Magnet sticker strips
  • Old plate/tupperware
  • Paintbrush 
  • Paper bag 
  • Tongue depressors 


   I always loved a technique similar to this when I worked as a preschool assistant so I just tweeked it a little bit so we could do it at home.  Start by finding an old plate or tupperware container you don't mind getting paint on...it will wash off in the end so I just used a normal plate we had in the cabinet.  Grab the coffee filters, too. You need 1-2 filters for each butterfly so grab accordingly.  Flatten the coffee filter onto the plate and have your watercolors ready.
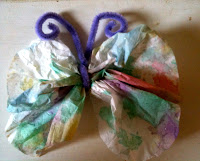
  Let your child paint the coffee filter with the watercolors. The filter will get soaked in paint and at some point you have to stop your child and give them a new filter.  Put the wet coffee filters on a paper bag to dry, I find the paper bag soaks up the excess water the best and doesn't stick to the wet filter...you could also use paper towels.
  If you want to make a butterfly without magnets, fold a pipe cleaner in half, gather the filter in the middle, and wrap the pipe cleaner around the middle. This is the butterfly's antenna.
  If you want to make a butterfly that will go on the fridge, gather two filters and hot glue the centers to a tongue depressor.  These are the butterfly's wings, put them close together or far apart...where ever you child thinks looks best :) We did a few of both.
  Now bend a pipe cleaner in half leaving a small loop at the bottom to attach to the tongue depressor. This is the antenna. Attach the antenna to the topside of the tongue depressor with your hot glue gun, on the same side you previously glued on.
   Once the glue on the wings and antenna is dry, cut two, one inch strips from a magnet sticker strip. Peel the backing off of the magnets and apply glue to the areas on top of both wings. (see pictures.) Place the magnet pieces on top of glue and allow it to completely dry.
   All you have to do now is stick them to the fridge, or make more! We made extras while we had all of the supplies out because I plan on using them as gift toppers! Cute, right?!
   If you really want to get into it, check out my egg carton caterpillar to explain to your kids how a butterfly is born! Or, make a packing peanut painting of a caterpillar!


Repurposed Frames

   This is another project that I have been doing for years. It's so easy and will really save you a TON of money. All you need are old frames, or frames purchased from the thrift store, and some paint. I love to group a bunch of pictures together, but that can get pretty expensive. This idea,  takes so little time and money and  will give you a beautiful arrangement of pictures you can be proud of!


Materials:
  • Spray paint (or any kind of permanent paint.)
  • Assortment of thrift store frames
  • Drop cloth
  • Painters tape  

   To start this project, make a run to your local Goodwill or any other local thrift store.  Go straight to the frame section, and trust me, there will be a HUGE frame section. It always amazes me what some people will throw away.  Luckily, for me, they decided to recycle it instead :)  Choose an assortment of frames with different textures and border widths. Don't worry about what they look like now..try to look past any ugly floral patterns or paint chipped frames, they will be beautiful when you are done with them! The one thing I do suggest is only choosing frames that still have the glass intact-you need frames with 'good bones.'   First, take the frames apart leaving the glass separate so it doesn't get painted.  Now grab a drop cloth so you can prepare for painting.  I try to keep the pieces together so I know which frame went with which parts.  You can even go as far as labeling them with a pencil before you take them apart.  You want to have just the actual border part of the frame, but if the back stays attached you can just take out the glass and cover any area you don't want painted with painter's tape.

  Bring your frame pieces to your drop cloth and cover with one coat of paint. Use even strokes so you avoid any drops of paint falling and glooping on the frame. I usually use spray paint because it is so much quicker but you can always use paint and a brush, too. Allow your frames to dry for at least an hour before applying another coat of paint. I recommend at least two coats so your frames are not splotchy.
  Let all your frames dry overnight then re-assemble to see the magic you have made! Now all these matching frames are ready to be hung in your home! Don't you feel so proud of yourself?! Go enjoy and repeat :) These frames would look great over your DIY headboard!
 

This is the paint I used for this project (I used whtite):


Sunday, February 24, 2013

Recycled Race Car

   This recycled race car will give you hours of enjoyment and will double as a toy box when your kids are done with it!  It was another rainy day when thought of  this old favorite.  Like any boy, my little guy LOVES to 'play cars'.  It doesn't matter how old, beat up or how many missing wheels there are-a car is a car to a two year old.

Materials:

  • One cardboard box (usually the grocery or liquor store will give you one, or several, if you just ask!)
  • Spray Paint (you only need one color, and any you have on hand is fine.)
  •  Two paper plates (Styrofoam works, too.)
  • Black sharpie
  • Washable markers
  • Crayons
  • Stickers (we used 'transportation' themed stickers but any kind will do.)
  • 4 Brads (if you don't have these, and don't want to make a special trip for them, you can use glue instead.) 
  • One excited kid!

Saturday, February 23, 2013

Pipe Cleaner Accessories!

   This is a great project for developing hand eye coordination.  It will also help to avoid alot of frustration for the little one's who can't quite string beads onto a wobbly strand yet. We happened to inherit a TON of beads from my mom, Gigi, so we decided to take full advantage of our surplus :)
    
Materials:

  • Pipe cleaners
  • Beads (use beads with larger holes for the little ones who can't string them yet.)
  • A happy kid!
  • Buttons (these are a new, fun type of 'bead' to string.)
   This project is pretty self-explainatory.  Simply show your child how to string the beads and buttons onto the pipe cleaner and encourage them to be patient as they fill it.  Leave about an inch bare on either side so you can create the bracelet enclosure.
   Once they are happy with the amount of beads on their pipe cleaner, they can decide whether they are making a bracelet or a pair of silly glasses...or both!
    *To make a bracelet, once you are through stringing beads, shape one end of the pipe cleaner into a circle and use the other side to fasten it by wrapping it around the end of the circle.  

    *To make a pair of silly glasses, make a bracelet but don't create the enclosure at the ends.  Instead, wrap the ends around each other to avoid the sharp ends of the pipe cleaner sticking out.  Now make another circle but attach it to the other circle the same way you closed the first one. Use two additional pipe cleaners without beads to create the rest of the glasses.